Creating a campsite
How to make a level spot in your woodland for camping
Many woodlands are on steeply sloping ground, as mine is in North Wales. It is easy to get frustrated by this but this slopiness is often why they have survived as woodland at all - because when land was being cleared they were too steep to be "improved" for agriculture. Slopes in woodlands can be very appealing as they often go hand in hand with spectacular views and mountain scenery. To enjoy your woodland more, however, you may want to make a level area to pitch a tent or for green woodworking. Where access is good enough for heavy machinery then large level areas can quickly and easily be created with a digger. However, in remote areas of the woodland, particularly higher up on the land, where you might want your campsite or working area, it may be impossible to get access with an excavator. In this situation it is possible to create a good sized level patch in a couple of days with just a few hand tools that could easily be carried through the woodland, such as a bow saw, a billhook, chainsaw and spade.
 Choosing a site to level and clearing undergrowth ready to dig
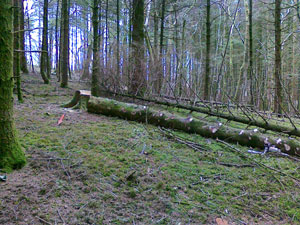
In creating a flat area the first, and most important part, is to take some time to choose the best site. I chose an area with views, that was also sheltered, and where was already a natural clearing. I removed the undergrowth and enlarged the clearing by felling a few trees along its edge. These felled trees were then cut into movable-sized lengths and placed along the lower edge of the slope. I then rolled these against some remaining trees at the lower edge of the clearing. The smaller diameter timber from the tops of the felled trees were made into stakes by cutting points onto them. I then knocked these into the ground below the trunks to secure them further and created a log wall to hold back the soil. I then marked a straight level line, halfway down the clearing and running across the slope.
 Digging out and making benches for your woodland
The next task was to dig out all the soil from above the line and use it to back-fill below the line and up against the retaining wall for tree trunks. Such a technique means that every shovelful moved is doing two jobs - taking out the high bit but also building up the lower part. This was done using spades, shovels, a pick axe and a mattock, and if your clearing is large you might find a wheel barrow handy.
The soil was compacted by regular trampling by foot throughout the back-filling process. The final result was a very useful level area of about 5m in diameter. This same technique could be used to make several smaller level areas for a few tents, perhaps surrounding a communal area with benches and a space for a campfire.

Comments are closed for this post.
Discussion
Simon…you said at the end of your post…If you just want somewhere to live off-grid, with cheap rent and minimal effort, then maybe looking at different types of land ownership (some of which already has planning permission) is more for you.
could you elaborate on this for me please?
thanks in advance
dave
As I understand it, the guidelines are rarely rigidly enforced, and are there as a ‘tool’ to control inappropriate behaviour. If you’re building structures and planning to – effectively – live there for long periods, then these regulations could and should be enforced… the rules are designed to protect the woodland, the trees and the ‘rural’ aspect of these dwindling resources. Often, they are SSSI’s or contain species of plants and wildlife that are threatened by agriculture and building development.
But if you’re only in your woodland camping every other weekend (especially if you’re treating it respectfully with the bushcraft adage “leave no trace”), or for the odd week at a time, I can’t imagine anyone getting upset about that.
Providing common sense and ‘good practice’ guidelines are followed (and there’s a wealth of advice on this site), I don’t think anyone is going to be sending round the woodland equivalent of Civil Enforcement Officers to slap a ticket on your tent.
Running a commercial business, erecting permanent structures and living ‘on site’ for months at a time means a whole different set of rules need to be applied, and relevant permissions sought: Owning a woodland doesn’t grant you immediate rights to live off-grid and make it a residence.
If you just want somewhere to live off-grid, with cheap rent and minimal effort, then maybe looking at different types of land ownership (some of which already has planning permission) is more for you.
I totally agree Emma. I too find it ridiculous and also greedy to ask for such large amounts of money with nothing in return. I would love to buy a piece of land, but live there in a yurt or something similar. It can be moved, so shouldn’t be an issue, but still, it’s not ‘allowed’. So what is the point?
And how would they find out whether you stay there for only 28 days…?
I do think that law is quite unfair in all honesty. You pay 30,000 for your OWN land yet you have to abide by a law that you cannot camp/sleep on your OWN land!? Of course I understand that building houses on woodland wpould be denied, as I wouldnt want that as they should be kept as weoodlands but if you wanted to sleep in a small hut/ tent o your own land then it should be allowed!
Camping is allowed for up to 28 days a year in UK woodlands. This experience is enjoyed by many individuals and families in their own woodlands.
Hey Daniela – that’s a very good question. I was talking to someone yesterday and we were wondering if camping was an option.
We are thinking of buying a woodland, is camping allowed?
I thought you were not allowed to stay overnight on a regular bases or does that only apply when considering building a permanent structure?
Very good and helpful, thanks.
Great idea, now all I need is some woods to do it in!!!
Very good and interesting article. Thank you!
This is a fantastic article, much appreciated. Will there be a continuation when there are some tents and green wood working utilities added to the area?

Is it possible to bring water / electric to a woodland for personal camping use?
Perhaps establish a shed?
Hannah
25 February, 2018