Whittling: wood carving keeps the mind sharp
Wood whittling is so fulfilling, say the experts, it can develop into an addiction. It may start as a leisurely pastime but, before you know it, it develops into lifetime pursuit for many. First of all, whittling is an easy hobby to take up because it is cheap: a sharp knife, a piece of wood and a bit of oil is all you need. Secondly, whittling produces many a useful and loveable object such as spoons, bowls and figures which are unique. Also, whittling is relaxing and enjoyable so it can work wonders at settling down a busy mind. For holding a sharp knife in your hand to shape a small piece of wood requires undivided attention and focus, so whittlers become completely absorbed.
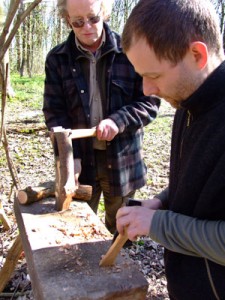
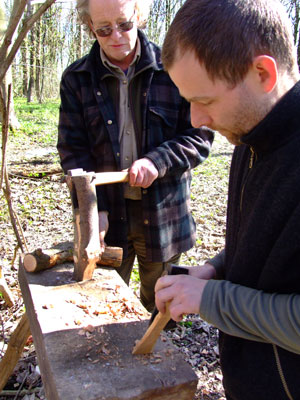
If you are lucky to own your own woodland, or visit one frequently, the temptation to turn odd pieces of wood into useful or decorative objects is huge. David Alty and Dan Watson of woodlands.co.uk, two seasoned whittlers, tell us step-by-step how to make our first ever whittling project fun.
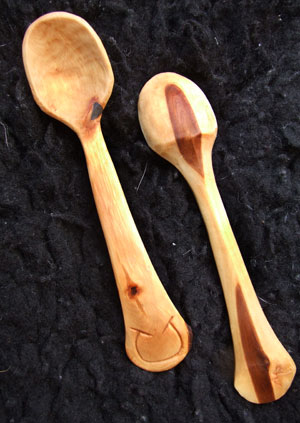
How to make a spoon by David Alty
David Alty of Brampton in Cumbria, developed an interest in woodworking as a young scout. In the last ten years alone, he has turned out dozens and dozens of spoons and knives (the sort you use for spreading butter or cheese), progressing through various designs. For David, whittling is more than a hobby: it is now an essential part of his life. David says: “Every Christmas, I make sure that many of my friends and family get a spoon I’ve made. This is my way of giving them something that is unlike anything else. For every single carved project is completely different in sheen, grain and shape. This keeps me busy creating things the whole year round.”
David recommends making a spoon as a beginner’s project.
Tools: Sharp edge knife (preferably not a pen knife); a saw to cut the wooden pole in half, a wooden mallet to knock the wood, a hooked knife, a piece of charcoal or a pencil and fine sandpaper (optional).
Type of woods: Silver birch, willow or sycamore. These species grow readily and easily in woodlands. They are good woods to use, as they are soft and easy to carve. Sycamore is also germ-resistant.
How to make a spoon
- Step one: Select a straight piece of wood from any part of the tree. There is usually a huge amount of wood waste in a woodland, so look around for a good piece. Green wood is best - the fresher, the better, as green wood is easier to work.
- Step two: Start by cutting the wood block to a little longer than you need for the finished spoon and split it in half along its length. You can do this by placing the knife with the edge across one end of the pole and carefully, using an off cut from your pole as a mallet, knock your knife into the pole. Do this slowly, without forcing. You can also use a froe or saw for splitting the wood in half.
- Step three: Remove the pith along the log. This is the thin brown line that runs down the centre. This will reduce the danger of the final spoon splitting down later.
 Step four: Split the wood in half again so you end up with a flat piece. Decide on the width, length and depth of the spoon. Most beginners make the mistake of aiming for a deep bowl. This makes the spoon uncomfortable to use in the mouth and of course, it takes more time.
- Step five: Draw your spoon design on your wood block using a piece of charcoal or pencil, marking the handle and the bowl. A cereals spoon is no more than six inches long and three inches in diameter.
- Step six: Using a very sharp knife (blunt is dangerous), whittle and slice around the outline. The best thing is to work along one dimension at a time, following the wood grain. Work from both ends of the piece, carving away from yourself in all directions, with small movements. You will end up with a square spoon, with no depth in the bowl.
- Step seven: Carve out the bowl. You will need an Indian crook or hooked knife, which has a curved blade. Work across the grain, gradually scooping out the bowl. Don’t go too deep. A word of caution: this step requires the most patience and precision and carries a greater risk of cutting yourself.
- Step eight: Decide whether you would like to sandpaper the utensil, recommended for beginners, so as to obtain a smooth finish. If you intend to sandpaper, store your work at room temperature for a few days in order to dry the wood out a little and make sanding easier.
- Step nine: Oil your finished spoon to stop it drying out or getting dirty. Get a nut oil from your local supermarket - walnut is a good choice. Avoid using olive oil as it goes rancid. Dip a bit of oil on a cloth and wipe the spoon applying two to three coats. It is a good idea to allow twenty-four hours between coats. The oil enhances the grain, protects the spoon and prevents it from splitting. If you are allergic to nut oil, you can use horse grade linseed oil (not the normal woodwork linseed oil).

Dan Watson of Leeds in Northern England, has been doing wood crafts for over ten years. When he first started working for woodlands.co.uk he learnt crafts such as how to build woven fencing, making charcoal and whittling as well as pole lathe.
He started teaching his own bushcraft courses in 2006. Dan says: “I really enjoy whittling. I must have whittled at least a hundred spoons and other objects. I sell a few, but not many - although that is not really the point, whittling is addictive. For me, eating breakfast from my own handmade wooden bowl and spoon is incredibly satisfying. Besides, the entertainment value of whittling is huge. Carving next to a campfire in the wood is far better than watching the best TV show. I hope my son will take it up one day.” Dan explains how to make a butter spread knife.
 How to make a butter spread knife
First, find a green, straight pole. Later as you get better at whittling, you can use a piece with a bend or curve.
- Follow Steps one, two, three and four above. To make a butter spread knife, you need to end up with a piece that is ten inches long, two inches wide and three quarters of an inch thick. The finished knife will only be around eight inches long, but the extra length allows a firm hold as you whittle off. You should always hold the carving knife in the dominant hand and keep the wooden piece on the left.
- Step five: Mark the shape of the knife along the piece using charcoal from the camp fire or simply a pencil.
- Step six: Start carving out the knife handle. Note which way the grain is running and whittle off a little bit at a time following that direction, always away from yourself.
- Step seven: Turn your attention to the blade and start whittling off with the sharp knife. The spreading edge needs to be rounded and thinner. The back edge is straight, thicker and stronger.
- Step eight: When you are satisfied with the shape of your handle and blade, cut to size with a saw, removing the two extra inches from the handle so as to end up with an eight inch long knife.
- Next: Follow sandpapering and oiling instructions as for spoon. Recoat the knife with oil every so often. Do not dishwash.
Tip: If you are not able to finish the project in one sitting, put the wood work away in the freezer, otherwise the wood will dry out and become unworkable. Give it time to thaw down before you start again.
Comments are closed for this post.
Discussion
There used to be a guy in Scotland from whom I could order custom sized blocks of lime for carving. His contact details no longer work (they haven’t for a few years now). I hope he hasn’t passed away – he was charming and so helpful. Does anyone know of anywhere that will do custom cut lime carving blanks by mail order? There is a guy who advertises on eBay and says he cuts to size but he considered by order not to be worth his while – too small an order. ( I wanted 20 blocks, 10 of one size and 10 of another.)
I recently went to Toledo and bought my nephew a Toledo steel knife. He is a dentist so good with his hands. I would like to give him a whittling course for Christmas,
. He lives near Birmingham.
Any suggestions of a suitable short course. Ann
Hi,
I love the spoons what a skill and with very few tools, I found the bird whittler and got hooked on whittling it is amazing what you can do with just a knife and I love doing it in my spare time.
Or you could try http://www.facebook.com/WalderchainWood
Hi Lisa,
You could contact Jill Swan, Treedomwoods spooncarving, Canterbury.
Thanks
David
Hi Lisa,
Off hand I dont know of any but I will ask a friend of mine from down there if she knows of any and get back to you.
Hi -my husband has started an interest in whittling -would like to buy him a place on a whittling course -do you know any in kent or nearby?
Thanks
Hi Dan, I am in Leeds and very keen to get some instruction in whittling. Are you holding any day workshops or courses near by?
Many thanks
Jai
Dan,
I am in Leeds area and have been learning to carve.
1. If you’re ever doing a carving workshop nearby would love to know about it.
2. Have used all the green wood I had. Looking for a source of green birch or similar safe for carving utensils. Can’t find anything online.
Are you able to suggest anyone/anywhere?
Regards
Tom
Hi Jenny,
Basically you need a good sharp whittling knife and a crook knife. Greeenman bushcraft do a very good value knife http://www.greenmanbushcraft.co.uk/cutting-tools/knives/mora-companion-heavy-duty-mg-bushcraft-training-knife.htm
They also sell curved spoon knives in the “woodcarving knives” section.
If you wanted to spend a bit more then Ben Orford makes excellent knives and tools.
Coming from “up North” I am afraid I dont know of any courses in your area.
Hi. I wonder if you can help. My husband tried his hand at carving a wooden spoon but didn’t really have any tools and so it got forgotten about. I’d like to buy him the tools he would need for Christmas but can’t find any reference to what he would need. He has a saw and a mallet and general stuff in tool shed but any help with specifics on what he would need to help him carve his spoon would be fab, as would any links to courses/workshops in East Anglia (we are in Suffolk). Many many thanks.
Hi Allan,
I think if you are carving lettering or figures into wood then you are better off with seasoned wood.
However if you are making spoons or bowls with knives and crook knives then it is an awful lot easier using green wood. If you want to store wood and keep it green if you paint the endgrain with PVA glue that will keep in the moisture for longer. If you start a piece and dont finish it it can be kept green in the freezer.
Hi, to you all, yes another beginner, and yes obsessed with wood work, and carving. Have bought the knives and chisels and gouges and really got stuck in how ever, fining wood to carve is a problem for me, I have just done some breadboards for hanging up but found that there were two different kinds of wood glued together, one hard one soft, a bit like cork, which made a struggle. I got some wood of Dartmoor and got it in my shed, as a lot of you tube wood carvers say leave it for a year before you carve it, where as you say carve green wood as its fresh, so now I am confused as to what to do, does that mean it will be of no use being kept? its under cover but not in warmth or indoors. Anyway are there any wood carving courses in Plymouth area, there is one in exeter but I would have to get B&B and that is adding to the expense if you see what I mean. I watch all my tuition of you tube, but would prefer english lesson specially the choice of woods.
Am looking for someone who could run a whittling workshop on Sunday May11th as a tutor has cancelled at short notice. Can anyone do or do you know anyone who might?
Thanks.
just read through the spoon and knife tutorial, I think I may be bitten by the bug. Have you any courses in staffordshire planned for 2014, or know of any?
Tony
Dear Peter and Jim,
I have two spoon carving workshops at Greystoke near Penrith booked for 2013
06.05.13 and 22.08.13
Have a look at http://www.greystokecyclecafe.co.uk for full details.
Thanks for your interest
David Alty
I am also looking for a whittling course in the North West of England. Have you any suggestions.
Many Thanks
Jim
Are there any whittling/carving courses in The North West please?
Thank you
Peter
Have just read your piece on whittling and fully agree it can be additive. I recently completed a 3 day carving course with
Andy Noble from Naturescraft in Wiltshire and have been bitten by the bug. As soon as my newly purchased spoon knives arrived
I carved a small oval shaped bowl from silver birch, it’s quite thick, but the shape is quite good and I’m hoping to have the
time to do more and get more confidence to make spoons and bowls thinner and more delicate looking.
It was lovely to see your finished spoons but would have liked to see them half way through carving to help with the directions.
Happy carving.
Like the article, I do a lot of greenwood carving myself. It’s always nice to see it done locally.

Hi there,
thank you for this interesting article. I love carving spoons. David Alty has a great spoons collection with different designs of every spoon. Really great work!
Steve Jefferson
26 May, 2020