Simple steps
The construction of steps in your woodland can be a quick and simple task which will help you to access areas that are otherwise awkward to get to. Although you may be able to scramble up and down banks in the summer during the winter the same bank may become very slippery and impassable. Steps can help you get to more remote areas of your wood year round enabling you to take in a good view, look into a beautiful pool or harvest some timber.
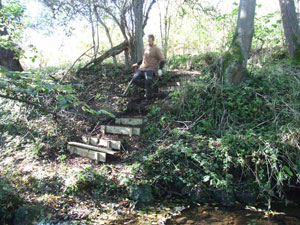
We recently constructed some steps which will enable a future woodland owner to get brook side access to a particularly nice pool and waterfall at Ordleybrook Wood. If this is the type of project which would enable you to get around in your woodland more easily here is a simple guide to how we constructed ours.
Location
Find the feature which you are trying to reach and do bear in mind the ground conditions. Are there any roots or large boulders which will cause difficulties? These can some times be used as steps in their own right. Pick the easiest route with the least amount of earth moving necessary.
Materials
Steps can be constructed out of many different types of materials. Stone can sometimes be collected from your woodland and also wood you have cut from nearby trees may be an option. For our steps we opted for pressure treated timber that we purchased from the local wood yard. This will be relatively durable in contact with the ground by comparison to untreated timber or wood gathered on site. For the step construction both the riser that retains the soil inside the step and pegs to hold up the riser are required.
Tools
Basic tools are all that are required for this task, a good sturdy spade will be needed for excavating the steps, a pick axe or mattock may also be necessary for more serious earth moving. A saw for cutting the risers and retaining pegs to length and also a sledge hammer for knocking and tamping.
Construction.
 Now that you have decided upon your route it’s time to get started. It is best start at the bottom. We started by setting our first riser in place and knocking two 60cm long retaining pegs well in to the ground. Our risers are 25cm tall and it is very important to ensure that the retaining pegs do not protrude above the riser as this will be a trip hazard. With the first riser in place we began to level the next step with all the soil we dug out used as back fill for the first step. In order to make the step firm enough the soil was tamped down firmly. To do this a sledge hammer or the flat end of a fence post can be used. The pressure of soil against the riser coupled with the firming up of the ground during tamping will hold the riser in place. It is now a case of repeating the process until the desired number of steps has been created. Do keep putting the soil excavated from one step on to those already constructed, additional soil and tamping will make for a good firm job. With our steps we were able to use a large tree root as a retainer for a step, if roots are encountered they should not be severed as this will be detrimental to the health of the tree.
Safety considerations.
When the steps have been constructed check each one for firmness under foot and also ensure that they are level from side to side and front to back this will make the steps easy to use, as will removing any trip hazards. Any riser retaining pegs which could not be knocked in beyond the top surface of the riser can also are sawn off at this point.
This is a great family forestry project to get all your friends and family involved with.
Comments are closed for this post.

Simple but effective woodland steps – thanks
Gordon Thomson Stevenson
18 July, 2023