Woodland steps – part 1
Not all woodlands are on level ground. Indeed, in this part of the country, it is rare to find one which is. Whilst most times a path winding its way through the wood is the most appropriate solution, there can be situations where steps are a better option. This could be where there is a significant change in levels over a short distance or where space is limited and a zig-zag path is not practical or would not look right. Properly constructed, steps can offer several benefits:
- they provide a permanent way,
- are an all-weather solution,
- are safer than scrambling up and down,
- add interest and
- discourage people from finding their own, multiple, routes.
In this and a follow-up article I describe two different types of construction which I have used in local woods: ladder steps and a more conventional flight of steps.
Ladder steps
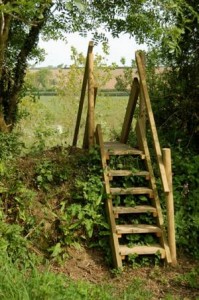
These are best suited to very steep changes in level, but only where the change in level is over a short vertical distance; this would not be an appropriate or safe solution for anything more than a rise of about six feet. A good example of where this is the perfect answer is the ladder I put in at Forda Wood, Kilkhampton, Cornwall. Here there is a mature hedgebank running east – west across the full width of the wood. We were reluctant to carve a gap through such a splendid hedge, which is home to many plants and creatures, so a short ladder going up and over the bank seemed the best way of enabling ease of access between the northern and southern sections of the woodland.
Construction needs to be basic but rugged, we are aiming for a solid and reliable practical solution; this is not fine cabinet making. The steps will be constantly exposed to the elements, so choose materials accordingly. 8” x 2” timber for the stringers or side rails (to which the treads are attached), 2” x 2” for the tread supports and 3” x 2” for handrails should do the job. It is best to use pressure treated timber in all cases. For the treads ie the bits you walk on and any top boards which straddle the top of the bank, I use decking timber. Fix using ‘outdoor quality’ screws or coach bolts, not nails. Over time, the treads will get slippery, so for added safety something like chicken netting or welded mesh can be fixed to the treads and top boards, using 40mm galvanised fencing staples.
It is tempting to construct the two stringers, with perfectly spaced tread supports, off-site eg in your shed where you have all your tools to hand, electric power, somewhere level to work etc. However, it is highly unlikely that the place where you are installing the steps will be level, so your two stringers may well be anything other than parallel / level once installed. By all means do as much pre-cutting and drilling of pilot holes etc of treads and tread supports in the comfort of your ‘workshop’, but leave the putting together of the various pierces until you are on-site.
Here is a suggested sequence of actions, based on personal experience i.e. having got it wrong several times:-
- Having selected your site, clear back as much vegetation as possible to a width of about four feet (based on steps two feet wide)
- At the bottom of the steps bang in a 3” fencing stake (5ft 6” long) to a depth of at least 18”. Do the same at the top of the steps ie on the top of the bank in my example
- Place one stringer board on the inside of the stakes, get it as near to upright as possible, tap it down into the bank a little to hold it in place and then screw it to the two stakes – at least two screws at each end, screwing from board to post, not the other way round
- Repeat this for the other side of the steps, so that the distance between the inner faces of the two boards is just slightly bigger than your chosen width for the steps. Measure the gap between the two boards at top and bottom (before finally fixing the second board) to ensure that they are parallel. You can check that the slope on the two boards is about the same by eye – use a clinometer if you must!
- From the bottom, take a short length of 2” x 2” (just a bit longer than twice the width of your tread boards) and fix it to the inside face of one of the stringer boards, a few inches above the ground. Use a spirit level to ensure that it is horizontal. Do the same on the other side, again using a sprit level to establish the exact position for the batten. If the battens are a bit longer than the width of the stringer, make sure that the bit that sticks out is at the front, not the back
- Now fix one of your tread boards to the front of the battens, aligning it with the bits which stick out
- Leave a small (less than half an inch) gap and secure a second tread board behind the first. This will give a step depth of 10” – 12” which is normally enough
- Keep repeating this process until you reach the top. The vertical rise between steps should ideally be no more than 8”-9”, certainly no more than 12”
- Now you can fix your handrails to the stakes. Before finally fixing, experiment with the height of the handrail and the gradient; a handrail which is parallel to the stringer boards looks right, but doesn’t always feel right – go with what feels most natural and comfortable to you
- If, as in my example, you are going up and over a bank, you now need to fix some boards across the top and then construct a similar set of steps back down the other side
- Once all treads and top boards are secured in place decide whether you wish to put some anti-slip mesh or netting on them. If you do, make sure it is held tightly in place, paying particular attention to the front edges of each step – tripping on the netting is likely to do just as much damage as slipping
Next time, I will describe the construction of a more conventional flight of steps: spades at the ready!
Comments are closed for this post.