Making wooden animals in your woodland
Making wooden animals can be a great project for children and even adults and can be done individually or in a group and you don't need specialised tools. However you will need some equipment. To make animals like these shown you will need:
- a saw to cut lengths of twigs or branches
- a drill with some large drill bits ("spade bits" work well) and some smaller ones
- a knife to remove bark and tidy up the parts
- some twigs and branches (ideally birch or hazel, but other varieties of wood work well too)
You could also use some rope or string (for tails), some nails and a small hammer (for fixing and for other features such as eyes), a mallet for banging in legs, and even some paint.
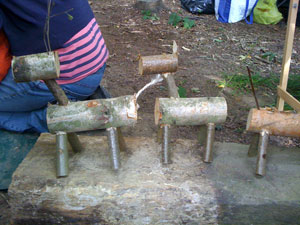
Putting a round peg in a round hole - not as simple as it sounds
In putting together these wooden toys you usually start with the body, or torso, and drill angled holes into it for the legs and neck. After that you will need to cut short lengths suitable for legs, neck and head. The secret to getting the legs to go into the body of your animals is to choose twigs that are slightly bigger than the holes you are drilling. You can easily reduce the thickness of the legs by removing some or all of the bark, but if they are too small you can't really make them bigger. Another trick, illustrated below, is to cut a large selection of legs so that something can be found in the pile of "legs" that will fit the hole you have drilled.
It depends how much you want your animal makers to be doing cutting and drilling - if they are going to find it hard to cut you may want to prepare your parts earlier, "Blue Peter" style. Don't use fallen twigs from the woodland floor - for this project to work well you need living wood freshly cut that will not snap easily and that feels strong and is workable. Twigs with bends in them can be useful and make legs that look more realistic - with knee-joints.
 Extra features on your animals - tails, eyes and even antlers
Extra animal parts allow the more able children in a group to keep going while the younger or less dexterous ones are still working on their legs and heads. You can use very fine twigs from birch to make exciting horns or antlers while tails can be made in two ways (at least) - you can nail the string/tail to the back of the animal or you can drill a hole and wedge the rope in. Some children will drill extra holes to make their animals a bit more more realistic, and why not? You can also use the drill to make eyes or you can make them with nails. The galvanised ones with large heads work well - easy to hit with the hammer and very visible. Woodland wooden animals can be prehistoric!
Creating these wooden animals is fun and allows people to celebrate the beauty of wood without having to be a skilled craftsperson and it gives a result that can be taken home. But making these animals has another purpose - it gets children fully engaged with the materials - unless they see how bark comes off and the way it can be drilled and how it splits they will always be passive observers. Woodland management is not a spectator sport and even projects like this help people start to understand what works well with wood. Hopefully with good preparations and sensible precautions making wooden animals will be hands-on but will not also become a blood sport!
Comments are closed for this post.
Discussion
I have made loads of characters and animals for our 2 1/2 year old,grandson. dinasurs,tortoise Stickman , sheep , tractor chcken,I wonder if there is a market for them.
Be good to have some more photos of examples please. I have only made reindeer but I’d like to make all the animals Ed lists. Elf and insect houses from logs also welcomed! Thanks
Paul harris
19 November, 2020