Making medlar cheese
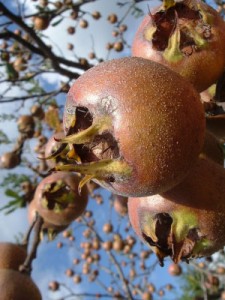
Medlars are a much under-appreciated fruit. We recently picked a large bag of medlars which would otherwise have gone to waste and decided to make medlar cheese. The first thing, to make them edible, is it to leave them to go soft and squishy - the medlars will change from a yellowy colour to a dark brown - this is called bletting and is essential to any medlar processing.
In our case this bletting had been largely completed while the fruit was still on the tree after the frost had got to them but we kept them a few days beyond that in the warmth of the kitchen in a well-ventilated corner.
 Medlar mashing and mixing and making mushy
To get the flesh out we squeezed them to break the skin and then scooped out the insides with a spoon. This is then put through a sieve which eliminates the five seeds and the skin from each fruit. We also squeezed the residual skins to get the last of the flesh out - it's messy and gunky but satisfying once you have a sieved pile of medlar pulp. You then weigh the pulp and put it into a large heavy-bottomed pan with an exactly equivalent amount of granulated sugar and heat over a low heat stirring well until the sugar is dissolved.
Turning up the heat - but careful
You can then turn up the heat and continue stirring until it becomes really thick: during this process it will "plop" and gurgle. Be careful not to let the medlar mixture splash on your face or hands as it is very hot. You need to keep at this until the mixture is really, really thick so that it won't even drip off the wooden spoon you are stirring with.
Moulds for medlar cheese
You can use a cup cake tin or a loaf-shaped tin. You should pour the hot mixture into the lightly greased tin (we also put a layer of teflon in ours to protect the tin). Once the medlar cheese has cooled, which may take a few hours (usually overnight, while your wrists recover and you dream of a moon made of medlar cheese), the loaf will become hard and the next morning it can be sliced into chunks which are delicious.
This makes an ideal present and is a novelty for most people who have often gone through much of their life without ever experiencing Medlar cheese. It is almost impossible to buy it commercially so you will be eating or giving away a delicacy which is unavailable in shops.
Plant more Medlars!
Comments are closed for this post.
Discussion
Bought a small tree from a car boot sale £2.
It fruited first year and is full of fruit now every year.
Brilliant.
[…] fruits were an important source of vitamin C in the winter months. They are used in the making of medlar cheese, or medlar jelly or eaten as a […]
As we have a Medlar tree and always have pounds of medlars, I have tried a variety of recipes in addition to eating the raw bletted medlars (which not everyone likes as it is an acquired taste).
Recipes tried are as follows:
Medlar Jam
Medlar Jelly always get a very firm set
Medlar Fool – scrape out bletted flesh (before it gets too runny), gently cook with a very small amount of water and add rum then when cold mix into whipped cream – this also freezes well in small containers.
Medlar puree makes a very nice pie using a pumpkin pie recipe
Medlar paste – mix with sugar and spices and cook down stirring (as in membrillo but to a stiffer consistency)
Medlar and apple chutney (HFW’s recipe at River Cottage) – keep for at least a year before using. Delicious with cheese – delicious
Medlar mincemeat
[…] Its high pectin content lends it to preserves — jam, jelly, or chutney — as well. A curd-like “medlar cheese” is another […]
A good friend of mine gave me some well-bletted medlars yesterday. I reserved some seeds from the raw and softest fruits, and placed them in some lukewarm water. I understand from some research that they need a good couple of winters to scarify and sprout, so I shall plant them in a pot with some soil mixed with sand, and leave them, well-labelled, in an exposed part of my garden, and see what happens. In true “Here’s one I prepared earlier” fashion, though, I am also ordering a small tree from a local nursery….
As for the gifted medlars, I squished them, placed them in a pan and covered them with about an 1″ of cold water, brought them to a boil, and simmered them for about 45 minutes, until super-smushy. (That’s a culinary technical term….) This morning, I passed them through a sieve, in batches, until I just had the skin and seeds left. I transferred the debris to a bowl, and kept sieving until the whole batch was done.
In true ‘waste-not-want-not’ fashion, I poured some cold water into the bowl of discarded skin/seeds, mixed it up, then poured the lot into the sieve for one final work-through which yielded a good half-cup more….
Now, it is quietly poppling and simmering on my stove, and turning the deepest rust-brown, maroon colour in the process…..
Watch this space. And thanks to the above recent contributors for more super creative recipes!
I’m still waiting to get a medlar grafted onto my hawthorn stock. This year we had a canicule, totally unsuitable for grafting anything as temperatures climbed into the thirties and forties for three months. Grafting apparently produces better and larger fruit than growing from seed. Have just found a ‘wild’ medlar tree at just the right time with the fruits bletting but not mouldy – yummy. Picked around 5 kgs and there were still loads left.
My Medlar is now 5 years old but fruited after the first year. One thing I would say is not to get too hung up on recipes, adding some twists of your own can make for some very good creations. I walked down the garden last year, grabbed a small pan of Victoria plums threw in a few lord Lambourne apples topped up with a greater proportion of Medlars. Boiled it all, added a bag of jam sugar, simmered it for a while, tested it on a cool plate for set, then sieved it through a metal sieve into heated jam jars. Result, the most wonderful clear pink scented jelly which lasted about 3 months.

Hi there just made some medlar cheese.
Used just flesh and sugar and heated till sugar melted and changed colour then put in mounds and lof tin… I’d read that it would be stiff enough to slice.. Is this correct. As mine is soft…
Also made some lovely curd cheese followed by gin soaked sloe flesh and crab apple chutney.. As if that wasn’t enough I made eves pud listening to my fav radio station what a lovely way to spend an evening x
Ceriboo
27 November, 2017