Woodlands.co.uk

Blog - Practical Guides

A camera for woodlands ?

A camera for woodlands ?

by The blog at woodlands.co.uk, 2 February, 2023, 1 comments

We, like many woodland owners, have stand alone battery powered trail cameras that record photos and videos onto a SD card.  They work well but obviously need regular monitoring to check battery state, and if the SD card is full.  Some time ago, I found a Reolink Go which is battery powered with the option of a Solar panel.  This camera records photos and videos onto a SD card, but differs from a Trail camera in that it has a SIM card. This allows remote access with live and remote viewing of photos and videos 24 hours a day. The daytime viewing is full colour, and black and white at night. There is sound, two way speech and an alarm all controlled from your mobile handset.  There is an option of "Push" notifications when the camera is triggered.  We live almost 50 miles from our woods and find it works well.  When I was researching the camera there was a review saying it worked well from 3000 kilometres but I cannot imagine many UK woodland owners would require it to work over such long distances. My original camera came with a V Sim which is a Vodafone data-only card, costing £4 per month with a monthly rolling contract.  These Sims are only  available via third parties now and are very expensive to buy but the subscription remains the same.  The cameras work on mobile Sims obviously using only the data aspect. The full technical data is available via the Reolink website and cameras are often discounted via the Amazon website..  There are other similar cameras, some more expensive but I do not have experience of these. We have seen deer, hares, squirrels, rabbits, mice, pheasants, extremes of weather and the occasional trespasser!  We enjoy the ability to see part of the wood from home when we are unable to visit. (The above post received from one of our 'woodlanders').  
Recycling in a wood?

Recycling in a wood?

by The blog at woodlands.co.uk, 3 August, 2022, 1 comments

It may be that a dead hedge is just that, your once carefully manicured box hedge which has now been ravished by the box moth.  However, in terms of managing your woodland, a dead hedge may have a different meaning. Here, a dead hedge may be a barrier to an area of new planting, it may be a way to ‘persuade’ people to keep to a footpath, or keep away from a pond / stream.   The dead hedge will be made from the bits and pieces that have be culled in clearing and thinning operations within the wood, material that foresters sometimes refer to as ‘lop and top’ and tree surgeons call ‘arisings. It can also include material cut from brambles and climbers such as ivy, honeysuckle and Old Man’s Beard (Clematis). Using natural materials to create barriers (and indeed) a habitat in a woodland is a way of using ‘waste’ in an ecologically sound way.  It saves having to remove trimmings from the site and offers opportunities to ‘top up’ the hedge if desired.  Obviously diseased materials should not be used.   Creating a dead hedge from clippings and trimmings is a way of using natural materials, rather than plastic & other materials that do not readily decompose.  A dead hedge will be an effective barrier for a period of time but it will break down sooner or later as bacteria and fungi break down the woody remains (lignin and cellulose).  The disappearance of the hedge will take time as the branches twigs etc are largely off the ground, so relatively dry and decomposition is facilitated by warmth and wetness. After its initial ‘construction’, the hedge will become part of the woodland, it will be colonised by some plants and it will offer shelter, nesting sites for birds and small mammals, and a ‘home’ to many different invertebrates, such as woodlice, beetles, even certain species of bumblebees.  As the hedge deteriorates, that is, decomposes, so the soil will gain in humus and fertility as the nutrients from the decaying wood etc are released through the detrital food chains.   Another way of using / recycling bits from pruning, clearing etc is by Hugelkultur.   Hugel beds are basically raised beds with a difference - they are filled with rotting wood and other biomass.  They are packed with organic material, nutrients and air pockets. Such beds can be an effective way of creating a productive area for growing fruits and vegetables in your woodland.  There is a woodlands blog about hugelkultur here. Large chunks of wood e.g. sawn up tree trunks can be stacked up in small piles and will over time make an excellent home for many invertebrates but especially xylophagous (wood eating) insects, for example,  saproxylic beetles.  These are beetles that live / eat in dead wood.  In the UK, some 600+ beetle species (from 53 different) families are associated with deadwood. Some feed on the deadwood itself (often with the aid of symbiotic bacteria in their gut), others feed on the fungi that are gradually ‘dissolving’ the wood.  Ants and wasps sometimes make their nests in dead wood.   Using wood to increase the organic content of the soil is good in terms of  carbon sequestration,  improving soil fertility,  water conservation and  productivity.  
rot inside trunk

Ultrasound scans for trees – how to measure rot in the trunk

by Angus, 6 July, 2022, 0 comments

Even if a tree looks healthy the trunk may be rotten to the core.  One day it will be vertical the next day suddenly horizontal and in falling it can kill people, crush cars and damage buildings.  So, knowing what's under the bark is really important.  Suspicion of rot might have been raised from a fungus, or a die-back of branches, or a hollow sound when the trunk is trapped.  In any event, it's one thing to suspect rot and another to know the exact extent of it and where it is, which is the problem that can be solved by a Sonic Tomograph, which is an ultrasound scan. The tree surveyor puts a series of nails into the tree in a ring around the outside - often about 40-90 cm above the ground - and he/she wires these up to the ultrasound.  The kit illustrated here is a PiCUS (named after the Latin for Woodpecker) made in Germany which can be carried in a small bag the size of a briefcase. For a horse-chestnut tree like this one with a diameter of about 2.5 metres the arboricultural surveyor needed ten nails.  Once these have been banged in through the bark, and the PiCUS wires attached to each one the surveyor then taps each one lightly with a special hammer and this sends sound waves through the trunk to each of the sensors attached to the other nails.  The PiCUS device will measure whether these sound waves are going through good timber, rotten timber or voids.  This then allows the computer to create a detailed and colourful picture of the trunk showing how much rot there is and where it's located in the cross-section. In our case the horse-chestnut tree, which looks fairly healthy, turns out to have rot covering 41% of the cross section.  Anything above 30% suggests the tree is unsafe and in this particular case the tree is overhanging a busy road and pavement so the whole tree will almost certainly need to be dismantled and replaced. Many of the sonic Tomograph surveys are done for local authorities and institutions to protect the public by reducing the risk of falling trees. A single tree only takes about 20 minutes to survey so there is good economy in doing several on each visit.  One official I spoke to said, "one reason we do these PiCUS surveys is so that neighbours and local people can see why we are cutting down trees that they love." The contractor here is Kim Gifford who is based in South East England and is on 07831 488456.  He's a very experienced surveyor and also spotted another rotten tree on his visit - a Tulip tree - which he surveyed and showed that it too needs to be cut down, sadly.  An alternative, in some circumstances is to take off the whole branch structure and turn the tree into a monolith, though in most circumstances it's better to eliminate the tree and start again with planting a new tree.
Tree Planting: Some things to consider

Tree Planting: Some things to consider

by Honey Wyatt, 2 June, 2022, 2 comments

So, you’ve decided to plant trees, or maybe you want to buy land for tree planting, but you’re not entirely sure exactly how to plant trees correctly. There are several things that need to be considered when going about planting trees, including choosing the right tree, deciding where to plant it, and making sure it takes root and grows successfully. Once you’ve planted it, you need to keep an eye on how it establishes itself in its new location. When is tree planting season? It’s best to plant trees with before the spring and summer. The rainy spring and hot summer conditions can spark the tree to grow, so it’s important for you to establish the tree in its new location before this change in conditions. As a result, the best time to plant trees is from November to March, with planting in November giving the tree a bit more time to get settled (for its roots to establish) before the warmer seasons. Though you can technically plant a tree in the summer, this could increase the chance of it not establishing. It’s best to plant trees when the weather is cool.  Where is the best place to plant trees? You have several options for where to plant a tree, whether that’s in your garden, on someone else’s land or on tree planting land that you have recently bought. When deciding to plant you must consider what the space has to offer; for example, if you have less space, like a small garden, it might be best to choose a smaller tree that’s easy to prune and that won’t interfere with the infrastructure of your house or its surrounding area. If you have a larger garden or a plot of land you’ll have more options, and could consider things including the topography, soil type and aspect, when selecting species. Though many trees can survive in any conditions, some prefer specific conditions. If you don’t own the land you’re planning to plant on, you will need to get permission from the landowner before doing so. If you do own the land, you won’t need planning permissions unless your project is over 2 hectares in size, at which point some environmental assessments may be necessary.  There are also some places where you can’t plant trees, such as on archaeological sites, or sites with rare or protected species. Grasslands that have never been ploughed, wetlands and heathlands are not suitable for planting trees. Planting next to some rivers could also be regulated, but you’ll need to talk to the Environment Agency to make sure. If you’re unsure about whether you can plant on your land, you can check with the Forestry Commission.  What species to plant? 
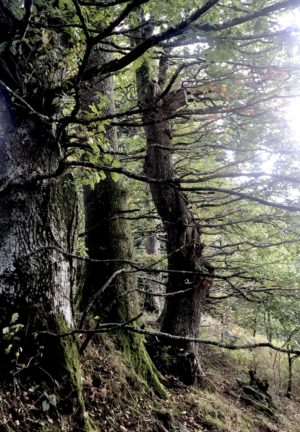
When it comes to selecting species, there is no right or wrong answer, and different species can flourish equally in the same location.  People often prioritise planting native broadleaved species, which is widely encouraged, but not essential.  Planting a range of species can improve resilience and resistance to disease, while also having excellent carbon storing capabilities! A diverse mix of deciduous trees will also be beneficial to wildlife.  In the UK there are lots of options for native trees. Examining what’s already growing in the surrounding areas will give you an idea of what will grow successfully. You might have a specific goal in mind when planting trees, such as attracting more wildlife to an area - a tree with nuts and berries (such as rowan, elder, blackthorn, or hawthorn) will be best for this - or maybe you’re looking to reduce flooding, in which case alders and willows are good options; particularly next to watercourses. The size of the space you have available is important to consider, as larger trees may eventually  encroach upon your home once they reach maturity, so may not be suitable in a back garden. For smaller gardens, consider trees such as crab apple, alder, bird cherry, dogwood, elder, or goat willows, which are naturally small, or trees that can easily be pruned back to the desired size like holly or hazel.  What do I need to plant a tree? 
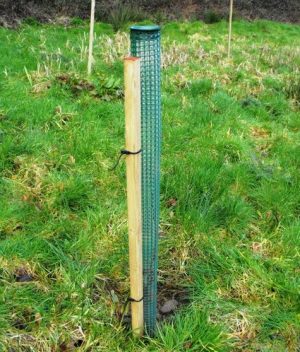
Not a lot of equipment it required to plant a tree: you’ll need a spade, a tree (which could be bare root, cell grown on root ball), a tree guard for protection and a cane/stake for support.  If there are browsers or grazers in the local area (such as deer) then stock proof fencing around the perimeter of the young woodland could be useful to keep them out.  A mulch (or equivalent material) is also important, to keep down the grasses and weeds which can provide unwanted competition for young trees.  Mother nature will almost always take care of the watering required, but some irrigation (from a spring, river or mains connection) can be handy in particularly dry spells. Rain water collection systems could also be utilised.   Steps to plant a tree Preparing the land & choosing a spot Before you dig a hole to plant your tree in, prepare the soil for planting. This involves cutting any grass short and weeding the area, which prevents the tree from competing with other plants for water and gives it the best chances possible! After working out the density at which you would like to plant, it’s sensible to mark where each tree will go with a stake.  This should be a safe distance away from any buildings, other trees or infrastructure (don’t forget about power lines and pipes!). Planting density can vary on species, as well as desired outcomes, but it’s worth bearing in mind that the denser you plant, the sooner you will get a closed canopy, which is a nice milestone in the development of a woodland.  Either 2m or 3m gaps are fairly standard.  For hedge planting smaller gaps are advised, with 30cm or so between each tree; for thicker hedges make a double row of trees in a zig zag pattern with 50cm between the rows.
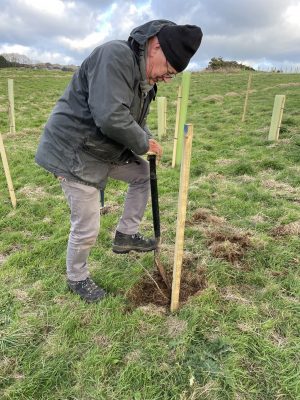
 Digging a hole Once you’ve done your preparation, it’s time to dig the hole! There are several tree planting methods, including pit planting, spiral planting, and t-notch planting. Pit planting works on all soil types; spiral planting works on bare soil and grass and is good for stony soil; and t-notch planting is a quick method for grass-covered ground.  Pit Planting Dig a hole deep enough to take the length of the roots of the tree. Pick up the tree by the roots and place it in the hole, pushing it to one side to see how deep it is in the hole and to ensure all the roots are covered. Using the heel of your boot or your hands, firm the soil around the roots, making sure there are no air gaps.  (Another way to prevent air gaps is to spray water on the soil after backfilling halfway, and again once you have completed filling the hole.) Place the tree guard around the tree and hook it around the stake, and push it around 1cm into the ground. Spiral Planting Press the depth of your spade into the ground, pushing forward to create a slit that’s deep enough for the roots of your tree. Using the spade to keep the slit open, place the tree inside the hole with the top of the roots 2cm below the ground. Remove your spade and push the soil back around the roots of the tree, again checking that there are no air gaps. T-Notch Planting Create the first ‘notch’ by pushing the depth of your spade into the ground. Then, to create the second ‘notch’ do the same thing at a right angle to the first notch, creating a ‘T’ shape. Return the spade to the first notch and lever it upwards, parting the section of soil. Hold your spade there, placing your tree in the space created before removing the spade to allow the soil to fall into place. Ensure that all roots are in the hole and adjust the tree so that it’s at ground level, before firming the soil around it. How To Plant A Root Ball Tree If you’re planting a ball root tree, or a tree from a pot, dig a hole 2-3 times the width of the roots, but no deeper than the length of the roots. Break up the clumps of the roots so that the roots don’t grow circularly. You might choose to leave 25% of the root ball higher than the surrounding soil level, and taper the soil so that it covers the roots before adding a layer of mulch. After Planting Mulch Mulch is a good way to retain the moisture of the soil surrounding your tree.  It can keep the roots cool, and protect the roots of your tree from extreme weather conditions. Mulch will also keep competitive weeds and grasses at bay, which can be problematic for a young tree.  Alternative options to mulch include bits of old carpet, sheep’s wool or anything that will keep the light off the soil and prevent growth around the base of the tree.  If you choose to use mulch, leave around 1-2 inches of space around the base of the tree, and place mulch about 1 sq/m around the tree. Watering Watering your tree correctly is extremely important for it to grow successfully. You will need to ensure that you water your tree correctly until its roots are properly established in its new location. This can take anywhere from a few weeks to a few months, up to a year. Here in the UK, in autumn and winter, our rainy climate is usually sufficient to enable the trees to establish and flourish on their own.  Some additional irrigation from a stream or water run off can be helpful if it is particularly dry. Pruning Before you plant your tree, you might choose to prune branches, but you shouldn’t do so immediately after planting. Wait until after a full season of growth to do ‘corrective’ pruning. Plant Around Your Tree The area surrounding your tree provides the perfect environment to plant other shrubs and plants. Planting wildflowers can help attract diverse wildlife and creates a variety of food and shelter for different species. If you’re planting several trees, the space between your trees will encourage different habitats to form and improve the biodiversity of the area. It could be nice to form a footpath between your trees so that you can easily access them and enjoy the advantages that come with being surrounded by nature. Go, go, go! Now that you know how to properly plant trees, get planting! Don’t be discouraged if the tree you’ve planted doesn’t grow successfully- there are endless variables that can affect why this might happen, but if you follow the above tree planting tips you should be on the right track. There will always be a certain percentage of trees which fail to establish.  There are so many benefits to tree planting on your physical and mental health, and is one way to do our bit to help the protect the environment from the effects of climate change, so there are plenty of reasons to keep trying!  
Tree Planting Spades

Tree Planting Spades

by Anton, 7 April, 2022, 0 comments

So, you’ve decided to plant some trees and are wondering what tools you’ll need for the job.  Whether you’re planting a select group of ornamental species, a bountiful orchard of fruit and nut trees or a new broadleaved woodland, there is one key aide which will take you a long way – the humble tree planting spade.  This is a short guide to what you might find on the market and the differences between various spades. Spade or Spear? Most tree planting tools will fall into one of two categories: Spades - those shaped like a traditional spade with a curved head and a flat cutting edge at the bottom.  They will look similar to a normal garden spade but much smaller.   Spears – those with a flat face and a point at the end, designed to create a slot in the ground when pressure is applied to the tread by foot. Spades can be used to dig holes for planting and move soil around, making them more versatile tools, whilst spears are excellent for planting cell-grown* or bare root* stock, but are somewhat limited to this sole function.  If planting larger trees with established root systems (root-ball* trees), then a spade is definitely the tool for you, as the slot created by a spear would not be sufficient to house the root system without causing crushing. In contrast, for those looking for an efficient method to plant lots of small trees quickly, for example when establishing new woodland for carbon offsetting purposes, then a spear should definitely be considered.  Comfort is key Like many things, it often comes down to personal preference and what you feel most comfortable with.  There is no right or wrong tool to use, as long as the tree is planted in a way that does not damage it (for example by burying the root collar) then you’re on the right track.  Planting trees is a wonderful thing to do and as much as possible, you should work with tools that make the process a pleasure, which hopefully means you’ll spend more time doing it! Other factors to consider An often-overlooked detail is the length of the shaft and handle, which for those who are slightly taller or have the odd back pain, can make a big difference!  A nice long handle will take the strain off those sensitive back muscles, as well as offering a bit more leverage which can be of assistance when planting in heavier soil types.  The materials and quality of construction is also important; try wherever budget allows to buy once and buy well!  Some cheaper tools made from inferior parts may not stand the test of time, or worse still let you down when you’re out in the field with a bag full of whips.  A solid wooden handle (or better still stainless steel) with a galvanised steel head is a good option, ideally with a double-riveted socket which will provide greater strength.  Where to buy and how much? Tree planting spades are available to buy at most garden centres and agricultural supply stores, such as Mole Valley.  They are also widely available to buy online from specialist tool suppliers.  Whilst you could pick one up from as little as £20, and pay up to £100 for the very best, you will be able to buy an excellent spade for around £30-£35. Bulldog Tools are a reliable supplier and would be a good option to consider. Do what works for you! Planting trees is good fun and of benefit to the planter, the wider community and the environment.  A communal activity and a great form of exercise, the more trees we can all plant, the better!  This means that you should use a planting spade (or spear) which is comfortable to use and gets the job done.  If possible, try out a couple of different designs and manufacturers (borrow from a friend or neighbour where possible) before making the decision, but always remember they are in essence doing the same thing – making a home for a tree where it will live for many years to come. *Tree types Bare root trees – Produced by sowing seeds into outdoor beds.  During development, seedlings are undercut to encourage a healthy root system.  When ready, the trees are lifted and shaken by a machine to remove the soil, revealing the ‘bare’ roots of the tree.  They can only be lifted and planted during the winter months when they are in a state of dormancy. A cost-effective option. Cell grown stock – These trees are developed in a compost ‘cell’ or ‘plug’ and can be seen as an intermediate option between bare root and pot grown.  When removed from the cell, the fibrous root system is contained with the compost which remains on the roots.  More expensive than bare root but generally has a higher success rate and can be planted all year round. Root ball or pot grown – These trees are the most developed and largest of the three options and are delivered with a significant ball of soil surrounding an advanced root system.  The root ball will be encased in a biodegradable material.  Great for those who want more established trees from the offset, although there is a price to be paid for this benefit.
Woodland toilets.

Woodland toilets.

by Margaret, 15 February, 2022, 31 comments

When we first had our wood, we didn’t worry about a toilet. “Go behind a tree” we told visitors. And the campers went off into the woods “prospecting” with a trusty spade. No problem.   But the years went by and we started to have visits from little girls, and older ladies, and we realised we were in trouble.    So we dug a hole. And over it we placed a large strong box, upside down, with a round hole in the top. And over the hole we fixed a toilet seat. On a post at the side, we hung a toilet roll. Simple, really. The rhododendron bushes were pretty thick just there, but for added privacy we erected a screen of dark cloth from the market, supported by poles.   And since that day, I have been collecting ideas from other woodland owners on the best way to do it: to be hygienic, civilised, and environmentally friendly. The best advice I had was to buy from the Centre for Alternative Technology a wonderful book called “Sanitation without Water” by Uno Winblad and Wen Kilama.  Tens of millions of people, to this very day, are surviving and flourishing, day in, day out, without toilets as we know them. And although none of us woodland owners expects to be in this sort of situation, the book has some very useful tips. “People need to choose the latrine that is best for their area and for their traditional culture.” Hence the toilet seat, which transforms the very primitive arrangement of just squatting instantly into something fairly acceptable. Though, as a ten-year-old said to me the other day, “That’s the weirdest toilet I ever saw”. The book recommends sprinkling dry ashes over excrement to prevent flies from getting to it, and this also much reduces the odour. We collect the old ashes before lighting the new fire, keep them dry in a big pot with a water-tight lid, and sprinkle them with a soup ladle.   Apparently, the mixing of urine with faeces inhibits the rotting which will naturally render the bacteria harmless. So we now follow the advice of the book, and spread a layer of vegetable waste, or just leaves, in our toilet each time we visit. Of course, the hole gets filled up, and when it is near the top, we cover it with a good layer of earth, and dig another hole. Moving our screen is fairly easy. Other people have told me they use a pail inside their box: one of those straight -sided containers used in wine making. Then they empty it in a hole far from the clearing where they picnic or camp. They actually have walls and a roof on their toilet; when it rains we just hold up an umbrella! Getting closer to the natural scheme of things, another owner showed us her “compost toilet” with logs arranged in walls round the four sides of the hole, and a nice smooth round one to the front for sitting on. She assures us it is very comfortable. Her screen is simply poles, tepee style, clad in branches.   A friend who visits frequently is slowly replacing our dreadful curtains with fine traditional hurdles, made from our own hazel.   And for a lock, a simple branch on stilts across the track leading to the toilet will suffice - after all no toilet in our own culture is complete without a lock, however notional!   This blog was originally published in 2006, but is often searched for - so we have brought it forward. Below is a link to another offering on the subject, from a woodland owner: https://www.themoonandthefurrow.co.uk/blogs/news/building-a-compost-toilet  
On buying a woodland

On buying a woodland

by David Harwood, 15 February, 2022, 0 comments

Recently, woodlands.co.uk asked me some questions about ‘buying a woodland’.  So here goes : How did you find your woodland? As a local, I found the woodland by walking with my partner and our dog. My partner’s family lived in the village for a number of years. Were there surprises you found in the first few weeks of owning your wood? The biggest surprise for me in the early weeks was the expansiveness of my woodland, every time I would visit I would find something different. This could be a different tree species,a path or a bird. Did you set up a campsite and how did that go?   One of my goals was to camp at least once a month, starting with my first month of ownership in January! Camping has given me the opportunity to spend more time in the woods, not just mornings /  afternoons and appreciate the peace and quietness. How have you managed the woodland?  Management so far has been cutting overstood hazel coupes for regeneration and collecting good firewood for home. Rotten or poor-quality wood has been collected and stacked for wildlife habitats, especially oak! The hazel rods have been for craft activities ,with the brush piles being left for insects. What are your future plans for the woodland?  Future plan for the woodland is to introduce different native species of tree. I have around 20 saplings I have potted on at home, that will eventually be moved into the wood. With the regeneration of hazel, the crop I intend to use to create deadwood hedges for protecting young trees from deer. How have various members of the family got involved in the woodland?  All of my family have visited the woods and helped in some way. Whether it be firewood, coppicing or bringing food to have with a hot drink!   What practical projects have you done or planned for your woodland?  How did you do these?  My partner and I both enjoy wood craft such as pyrography and woodturning. A lot of oak limbs that have come down during storms have been used to make presents for friends and family, and decorations for our home. What advice would you give to someone buying a small woodland?  My best bit of advice would be to wait for the woodland that has what you want. Woodlands come in all shapes and sizes; and getting the right patch can make your experience a lot more enjoyable. In terms of flora, what have you learnt in the woodland? I have learnt that woodlands like mine (broadleaf) provides a home for hundreds of plants, flowers and insects. The humid conditions in oak woodlands provides ideal conditions for rare / hard to find flowers such as orchids and so many types of fungi and lichens. David 
Detectorists, using metal detectors, becoming ... detectives

Detectorists, using metal detectors, becoming … detectives

by Angus, 27 January, 2022, 3 comments

When I say I get a buzz out of detecting I mean it literally: a good detector device makes a different buzzing sound for different metals.  A low note or deep buzz means it's probably iron and not worth digging up, saving the detectorist wasting time digging out old nails or fence wire.  In contrast, a higher/lighter tone means you are more likely to be finding bronze or even maybe the detectorist's dream - gold or silver coins. Today I did my first day of metal detecting with an expert detectorist, Joe Green, part of the "dynamic trio" as he and his team call themselves.  Joe took me around a woodland where he has permission to detect and we spent three hours scanning the ground and digging out finds.  In that short time we found: two old bullet cases as the wood had been used for army training in WW2 one bullet one musket ball probably dating from around 1800 CE, might be earlier two Georgian buttons one thrupenny bit / threepence, from the 1930's a buckle a worn Georgian halfpenny Less usefully we found one ring-pull, some foil, and about half a dozen discarded shot cartridges from pheasant shooting in recent years.  All the items we found were within six inches (15cm) of the surface and in good flinty/chalky soil they will usually be even nearer to the surface.  Clay soils are more difficult and objects often escape detection by sinking down over the years. According to Joe, my guide and mentor, it's a logical but probabilistic game where you look for features and ancient tracks and if you detect something interesting you should concentrate on that area as finds are often concentrated into "hot spots".  High ground is often promising and sites of ancient settlements can be rewarding.  Joe has been really successful and has found some gold and silver coins some of which are currently at the British Museum which may be bought from him.  As any detectorist will tell you, there is always a moment of optimistic anticipation between the moment when the metal detector bleeps and when you have excavated and brushed off your find.  After the tell-tale bleep it's not always quick to track down small finds and many detectorists use a small handheld device for the last bit of close-range finding, called a "metal detector pinpointer". Joe showed me how to use the detector so that the head of the device, the coil, was parallel to the ground and I swept the head in wide, overlapping arcs so that no stone is left unturned - if it's got a coin under it.  Some of these devices have larger coils which enable more area to be covered and give the coil a better reach.  For our detection we used a Deus 1 detector, costing about £750 but Joe is about to invest £1,400 to get the Deus 2. "The UK is remarkably liberal for detectorists and although you need the landowner's permission you don't have to be qualified to detect', says Joe. In France,  a detectorist needs a special license from Authorities to search an area of land, as well as permission from the landowner. In Poland, detecting is banned.   Joe adds that "you can't detect on Sites of Scientific interest, Ministry of Defence land or Historic Monuments.   Also, if you find "treasure", such as gold or silver over 300 years old - you have, in England and Wales, to give first refusal to the authorities in case they want to buy it from you for a museum.   Usually if they do buy you find, the proceeds are shared equally between the landowner and the detectorist". For my metal detecting outing I had done some armchair homework by watching Mackenzie Crook's BBC Four series called "Detectorists".  It's a magical introduction to metal detecting, the club rivalries, nighthawks (illegal night-time detectorists), and the use of detectors to find lost objects.  It also has some scenes where Toby Jones portrays a character who finds gold "treasure" which gets displayed at the British Museum. Joe has a real ear - and eye - for the metal detecting hobby and he's been doing it for 13 years.  On our outing he found a shiny city livery button which he has dated to 1825 and was bought from a London Taylor's shop.  Livery buttons were part of the uniform that was worn by servants to a particular estate / household.  May be it was lost whilst searching the area for firewood. My half day of detecting left me astonished to find just how much metal there is in an ancient woodland.   It made me realise just how much unrecorded history exists in every part of Britain and how much of life used to happen outdoors.  In our three hour session, we must have detected about 20 interesting objects over just a very small part of the woodland - in the whole wood there must be hundreds, perhaps thousands, of hidden objects.  History may be unrecorded here but it has left traces and detectorists have an important role in exposing the past life of woodlands. Treasure may be 2 or more silver or gold coins found together that are more than 300 years old, or if they contain less than 10% gold or silver there must be at least 10 in the find for it to qualify Any object that is more than 300 years old that contains more than 10% precious metal 2 or more artifacts which are base metal (not gold or silver) that are found together.  

« Previous PageNext Page »