Woodland pedestrian gates (2)
Now to hang the gate.
Put the top piece of furniture on the gate. We will leave the bottom one for now as this enables us to reverse the hinges on the gate and prevent it being carried off by anyone. Now decide how high you want the gate off the ground. If you want it to keep dogs (or kids) in then you may want to set it quite low to the ground. Make sure wherever you place it that it is not going to drag when you open it. Mark the post level with the bottom of the top hinge you have put on the gate. This is the height where you will need to drill a hole through the hanging post.
You need to mark the middle of the gate side of the post at this point. This is another fun part! You will need to drill a level hole straight through the post so you can put the top hanger onto you hanging post. The top hanger is the hook with the long section of thread and a nut on it. The easiest way to drill a hole is with ‘Ted’. This is a petrol driven drill which is an amazing bit of kit! You can also use a good quality high voltage drill here, or the old school way is using a hand brace if you have one - hard work but very satisfying! You will need a long auger drill bit for whatever piece of kit you have here, enough to get through the post and a similar diameter to the threaded part of the top hanging hook. You can create the hole with a shorter drill bit but you have to drill from each side of the post, which can be difficult.
If you have a helper ask them to line up your drill so it looks level, ie at a right angle to the hanging post. Then ask them to gently lean against the post on the opposite side from where you are drilling to prevent the drilling loosening the post. Make sure they are away from where the drill bit comes out the other side!
Once the hole is drilled remove the nut from the top gate hanger and put the hanger into the whole. Again using a helper to lean on the post opposite from where you are, tap the top hanger through until you have a gap of about 4-5 inches between the vertical part of the hanger and the post. Put the nut on and tighten, ensuring that there is still a gap of 3-4 inches between the hanger and the post.
Now you can put your gate on the hanger! Get your helper to hold the gate so it is parallel with the hanging post. Now position your bottom hanging hook so it lines up with the bottom rail of the gate. Mark the hanging post just below the bottom point on this hook. This is where you will place the bottom hanger. Also mark the position of the top of the hanging hook on the gate for when you attach it later. Now take the gate away. For this hanger you will need to drill a hole about half the length of the hanger itself, again as level as possible. Now tap the bottom hanger upside down into the post, ideally with a helper gently pushing again from the other side, until it is a similar distance from post to hanger as the top hanger. It is upside down to prevent the gate from being lifted off its hinges and stolen.
Put the gate on the top hook and let the bottom of the gate lean against the bottom gate hook. Slide the bottom-hanging hinge into position both where you marked it on the bottom of the gate and onto the reversed bottom hanger. Check the gate looks level, either by eye or with Neville. If not you can adjust the gate upward by screwing the nut in on the top hanger, or downward by tapping in the bottom hanger some more. Once any adjustments have been made, slide to bottom hinge on again as above. Drill through for the bolts and attach using the bolts and screws supplied with the kit.
If you are still not happy with the lie of the gate you can adjust slightly by tightening or loosening the nut on the top hanger.
To position your latching post, locate the gate to the position you will want it to be in when closed. You will need to leave a gap of about an inch of so between the gate and the post if you want it to fit flush, or the gate will need to shut to the middle of the post if you want it to latch on the inside/outside. There are many types of (Larry) latches available so have a look and pick one that suits your needs.
Install the post as described with the hanging post above. Fit the latch to the post and the catch to the gate.
Voila! If you have installed the gate in a fence line then re-attach and tension any cut wires to keep the fence line intact. Beware if you are going through high-tensile steel stock wire - this would need careful cutting after inserting the posts which would need strainers. If the gate is on an old hedge bank line, or in a clearing to create a focal point as an entrance to your wood then you may want to attach some post and rail fencing 6-12 feet either side to enhance the pedestrian gate as a focal point.
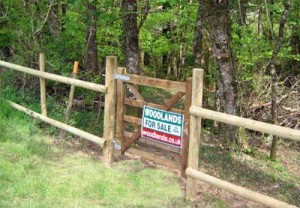
A small gate provides an excellent feature for the entrance to your woodland, or a special area within it. It can provide some added security and create an access point whilst keeping your beloved children or pets safe. It also helps you find the entrance to your wood if things have grown a bit since your last visit!!
Comments are closed for this post.