The Ghost of Workers Past Pt 3: Delving into the history hidden in your woodland
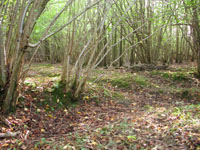
Recording your bank and/or ditch
It may well be marked on a 1:25000 Explorer map, so its position could be very easy to plot. But it may not be complete - there could be gaps in it where vehicle access has been bulldozed through, or where old trackways crossed it. You may also wish to plot the position of important trees situated on the bank. I'm going to assume you don't have access to a GPS (they're not very accurate, anyway - even the better ones), and you'll need to mark the position of gaps or end points on your map. This is quickest done by pacing - and it's surprisingly accurate. First of all, how long is your pace? Use a measuring tape and work out what an average stride is. Then all you have to do is pace the position of the gap from the nearest identifiable feature on the map. You can either invent your own set of symbols and do a key to identify them, or use a simplified set which are commonly used by archaeologists (from Oliver Rackham's book, "Ancient Woodlands").
If the bank is not marked on a map your task is a little harder, but very rewarding as you're adding to our store of knowledge by plotting it. As well as pacing it, you will probably need to use a compass in order to get its direction. If it's sinuous just do small bits at a time. I always work from one end and continue to the other. Once you get to the other end what meets on the ground usually doesn't meet on your map, so a little re-adjustment to your drawing may be necessary.

When you've finished drawing its position on your map, your next job is to record its section (what it looks like if you cut through it). This will vary along its length so you have to make a decision about where you do your section (or several sections), and mark that position on the map as well. As I'm usually on my own I set up a string across the feature and then get it level by sight. I can then measure down from the string to whichever points I think are important and how far along the string they are. Once you draw the measurements onto squared paper the profile of the bank just appears!
In addition to measuring the bank, an important part of your record is a photograph - or two. Another advantage of a photo is you'll look back in 5 or 10 years' time and say, "Did it really look like that?"
Interpretation
Now that you've recognised the feature, it's worth starting to think about how it fits into the culture of earlier times when woodlands were far more valuable than they are today. Why were woodbanks and ditches built and how long have they lasted? I'll go into this in greater detail when we start looking at documentary evidence.
Other more common features we'll be looking at in the future are charcoal burners' platforms and other flattened areas, sawpits, trackways, ditches, ironworking areas (in the Weald particularly), pollards and coppice stools, cant markers and standard trees.

South East Woodland Archaeology Forum
Reproduced by kind permission of the Small Wood Owners Group
Comments are closed for this post.
Discussion
I do now look differently (and imagining all sorts!) at a couple of features in my own woods and the information adds another dimension to a ramble. If the kids thought I could be a bore before…! Thank you for these very interesting articles. I do hope the series continues.
Hi Paul
Yes, David is going to continue the series – cutting back to one every 2 months though!
If you are in the SE it is well worth having David visit your woodland – but you have to be fit to keep up with his enthusiasm!
Tracy
1 February, 2010