A wooden summerhouse: part 3, a green roof.
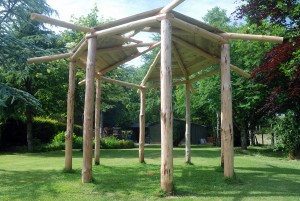
After a long break, construction of our summerhouse has now resumed. The reciprocal frame structure described in the previous blog now carries a ‘green’ roof and is fully weatherproof.
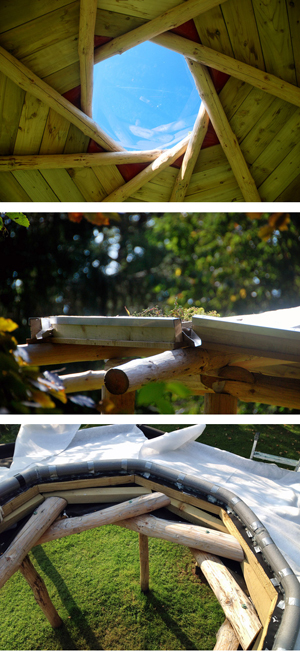
The first step in creating the green roof was to lay a deck of timber planks across the top of the rafters. The underside of these planks is left exposed to form the building’s ceiling. Fixing these planks to the frame was not as easy as it sounds; the geometry of the overlapping rafters threw up some awkward angles which became increasingly acute. At the very top of the roof, the angles meant that it became impossible to continue the timber right up to the central opening. A thinner, more flexible material was needed - provided, in the end, by some cut-up plastic ringbinders.
 A layer of felt was placed above the timber deck, followed by a sheet of pondliner to serve as the waterproofing layer. Another layer of felt on top of the pondliner helps protect it from UV damage and sharp objects. Aluminium trim around the eaves holds the felt in place. Aluminium sheet was also used to fashion spouts to channel rainwater off the roof.
The circular opening at the centre of the reciprocal frame is an important feature of the design and needed to be fitted with a custom-built skylight to complete the roof’s weathertightness. For this, we used a sheet of clear polycarbonate which is lighter and less prone to shattering than glass. An octagonal timber frame was constructed around the irregular top of the roof to establish a level surface for the polycarbonate. A ring of pipe insulation sandwiched between the timber and the plastic serves as a kind of gasket and was sealed in place with silicon caulk. The circular polycarbonate sheet was carefully lowered onto a bead of sealant on top of the foam and fixed in place with screws. Unfortunately the very last screw was tightened with a bit too much enthusiasm and cracked the plastic! However, it wasn’t a complete disaster - nothing a bit of clear tape couldn’t fix.
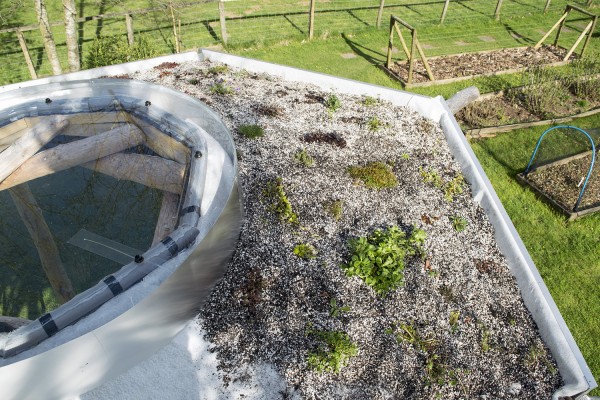
Rather than buying pre-planted rolls of sedum matting to complete the roof, we decided on a more home-grown approach. We gathered together an assortment of small individual plants - sedums from the local garden centre as well as cuttings from any alpines we could find in our garden - and planted them in a mix of compost and perlite on top of the roof.
Though it will undoubtedly take quite a while for our plants to spread and become fully established, handpicking each plant and choosing our own pattern of colours and textures has been much more satisfying than going for the ‘instant’ option. Some of the plants are really starting to flourish and will hopefully in time spread to form a complete, colourful carpet over the roof.
Comments are closed for this post.
Discussion
Excellent idea, thanks for sharing :-)
This is really impressive, thanks for sharing. This will serve as a great example for others who are planning to do a wooden summerhouse.

This is such a great project. Would love to see what it’s looking like these days!
Janet
4 January, 2017